Blender adventures I guess
Retrofying a fancy 3D model into a PS1 style asset (using texture baking)
This is not a tutorial and maybe not very useful at all. I wanted to put it out anyway :)
I've learned a method of texture baking in Blender: it's possible to "bake" (render) one object onto the surface of another object which has completely different geometry.
Typically this is used to turn a high poly asset into a game-optimized low poly one, and the two should look nearly indistinguishable. But in my case it means: turning a PS5 style asset into a PS1 style asset (which is just the right thing to do!)
High poly (high detail) model
This is the high poly model: All the key caps, USB ports and plastic pieces have geometry. The plastic is translucent. It takes a fast grapics card to render it.
This is the viewport render in Blender:
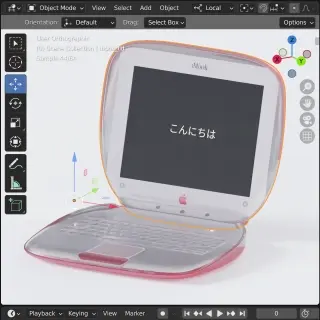
Notice how the keyboard and USB plugs have a true 3D geometry.
Low poly model
And below is the low poly in Firefox, displayed with three.js. It's intentionally stylized to look like PS1, it actually runs smooth on very high resolutions as well! The complex details are not there anymore, they've become texture details.
This is in a browser:
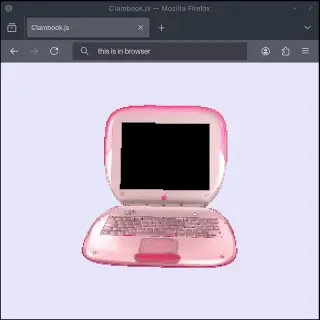
It worked out the first time! I only had to tweak with lighting, which in this case is an importaint choice: lights and shadows will be baked into the texture permanently. I think a soft lighting that's reminescent of ambient occlusion is a good solution. That sort of lighting doesn't look too weird from any angle.
How to do this in Blender
First - if you have the high poly model - create a low-poly version of it by copying and simplifying as much as possible. There is no one way to do it, just take away detail that matters less, e.g.: flat surfaces don't need to be subdivided and curves can always be a bit less smooth. Sometimes the 'Decimate' modifier works, but careful with that.
The low poly object then needs a UV map and a material with an unlinked Image texture node (that's one weird setup). The resulting image will be baked onto it.
Then select both models, and within Blender's Bake feature click "Selected to Active" to bake from the selected (high poly) to the active (low poly object).
Good chance things will go wrong at first, but eventually it will work!